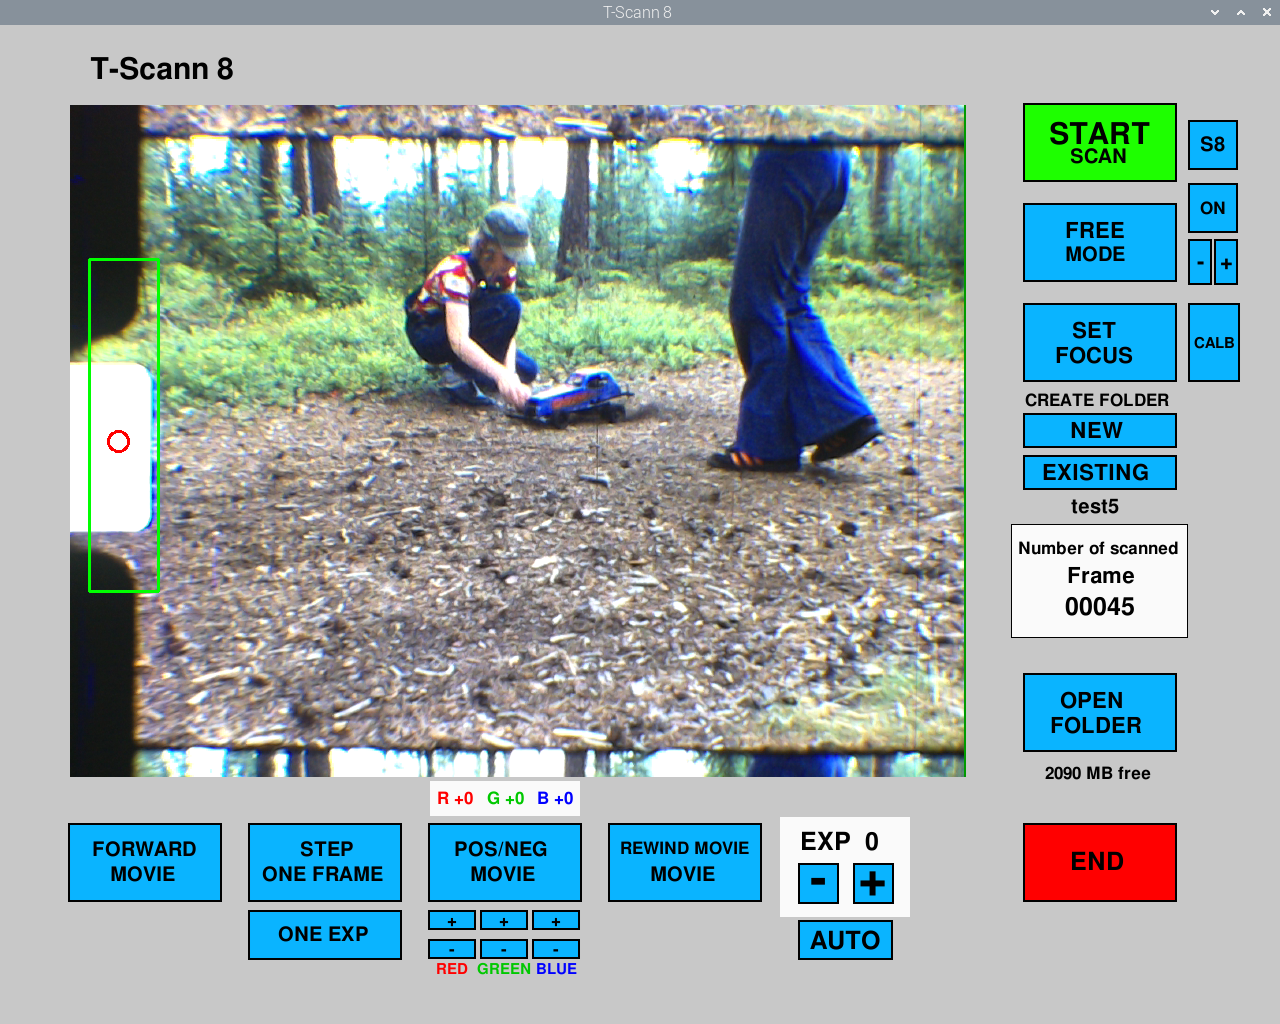

T-Scann 8 - project page
Super 8 / Regular 8 film scanner
Raspberry PI user interface - ver 5.0 64bit - / settings and operation.
With instant stabilization and faster scanning!
New features ver 5 require update to Arduino ver 4.0
T-Scann8-UserInterface-V5.0.py put this program file on the desktop of the Raspberry Pi click on it then a program called Thonny Phyton IDE should start, then press the play symbol. This program can be found in menu / Programming
Instructions on stabilization and what's new in version 5
Testing different storage media 2026
HQ camera and original setting in user interface, each frame will be about 4Mb (PNG) 2028 x 1520
The Python program is set for the HQ camera
These settings can be changed according to your own taste and
type of film. Be careful with sharpness it cannot be made smaller in
post processing.
154 picam2.set_controls({"Sharpness": 20.0}) # 0.0 to 100.0
155 picam2.set_controls({"AwbEnable": False})
156 picam2.set_controls({"AwbMode": 0 }) #Auto=0
157 picam2.set_controls({"Brightness": 0.1})
Open the file manager. Close the file manager on X,
-AUTO- The program starts in AUTO mode, switch to MANUAL. Then exposure can be set and color correction.
The page is made for an older 4:3 monitor, Raspberry PI has
output for HDMI, but most older monitors have DVI input. There are cheap
adapters to buy to solve this problem.
Default resolution(2028 X 1520) is this if higher resolution is desired
up to 4K / 4056, 3040 is desired
137 MAIN_WIDTH = 2028 # or 4056
138 MAIN_HEIGHT = 1520 # or 3040
Resume scanning type in the name of the folder in the popup box, enter the last box on previously scanned frames, for example 1230 then the next frame will be scanned 1231. If the last frames from 1200 are to be scanned re-enter 1199, then 1200 and so on will be written over with new frames.
Save frames on hard drive or a fast USB stick.
The easiest way is to use USB memory that does not draw a lot of power
as hard drives do, also applies to SSD drives. It is a bit of a
problem to use hard drive if it takes power from Raspberry PI with
separate power supply no problem. The disk must be formatted as fat32
which both PC and Mac can read.
Important!
Default name of disk is SMALFILM important to name the disk
#Change SMALFILM to any name on disk or USB memory
163. location = "/media/pi/SMALFILM/"
Open the file manager. Close the file manager on X,
Rewind the movie Must be loaded around the rear rewind wheels! Not when the movie is loaded in filmgate.
Drive the film 1 frame
This function is convenient when the film gate is set, so the image is as above
Color correction
Scan negative There are nowadays negative super 8 films to buy
-AUTO- The program starts in AUTO mode, switch to MANUAL. Then exposure can be set and color correction.
Take a picture without extending the film At each click a beep is heard, the number of frames i counted
Color correction
These values may need to be changed
Very important when scanning negative film. The film's red/Blue
background must be removed, difficult to correct in post-processing
ONE EXP Take a picture without extending the film. This feature is for testing, take a picture look at it in computer color ok? Exposure good? Sharp enough?
Rewind the movie, must be loaded around the rear rewind wheels! Not when the movie is loaded in filmgate.
4K with Rasberry PI 4B 4GB is a bit slow so I recommend PI 5 or you can change to save jpg without compression. PNG will be about 21 MB and takes a lot of processor power. 2028 x 1520 about 4 MB